Version D1.90.020
First-class CNC control software!
|
Mach 3 - User Guide Download (PDF) |
Download the demo version and try. (DEMO) |
Here we present an improved version of Mach3 CNC control program. Demo version is fully functional, only a limited range of G-code. This means that the simple shapes and designs can be easily milled. For larger files, you must purchase a license. It is possible to order it for me, after registration you will receive a file that is installed into the Mach3 folder - and that's all.
With this program you can customize your desktop as you like. Serves to set Mach3Screen.exe.
Main features:
- Connecting via LPT port, Step / Dir system (freely configurable outputs to LPT)
- Max. 6 axis control,
- Three, max. 45kStep/sec speed pulse generator,
- Very smooth and stabiklné pulses
- Exceptionally variable hardware and software setup,
- Import the following files: G-code, HPGL, DXF, JPG, BMP,
- Utilities: Encoder, PWM, RS232, USB, stb. programming
possible in Visual Basic
- What is interesting - the range of capabilities is very cheap compared to similar!
Minimum requirements: Win. XP, 1.4GHz, LPT port.
Basic functions are similar to Mach2!
Demo version can be found at Art of CNC. Limit demo version is a 1000-line G-code. The pulse generator is limited to the 25 kStep / sec.
(Táto funkcia slúži na import prac. plochy)
Freshly installed must be configured to communicate with the electronics. Settings are described here for our electronics. These settings are stored in the file Mach3Mill.xml.
Described here only approximately describes the different settings. Given the enormous potential of the program is not possible to show everything. This is what a guide for Mach3.!
The most important settings: Config menu.
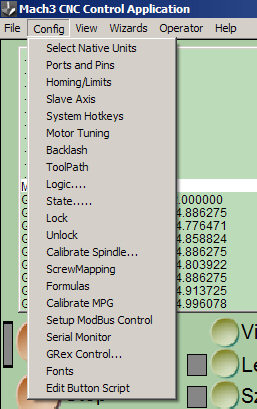
(Setup)
Select Native Unit:
Setting the rate used.
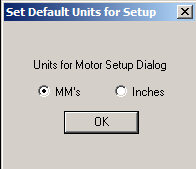
( mm )
Ports and bits - their location and use.
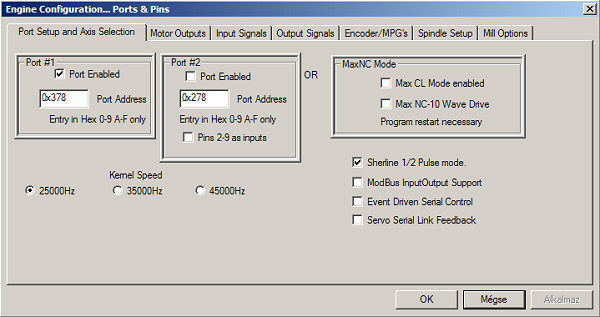
(LPT port and address, etc.).
Software can use 2 LPT ports (6D). Here are entered and a link to the speed of the pulse generator is sufficient for our electronics 25000Hz.!
(Step/Dir )
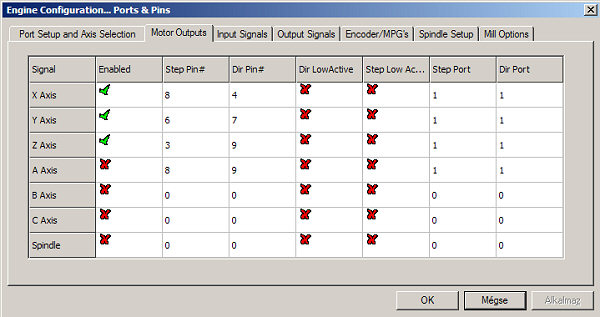
Here you enter the value of Step / Dir for each axis. Dir level can be changed in the window LowActive thereby changing the rotation direction. Step / Dir indicates the pins on the LPT port, and so will vary depending on the electronics. Individual settings for our drivers can be found on the website.
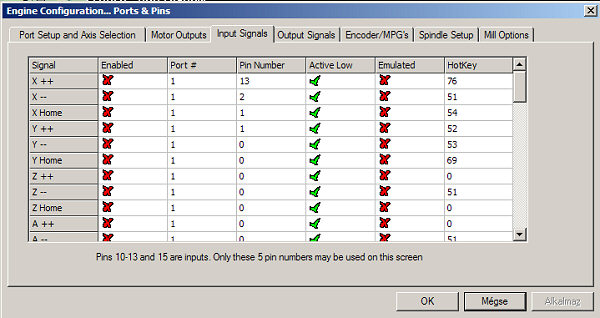
(Inputs conc. switches.)
Profi1 do not use these inputs (unlike Profi2B card)! The picture settings for driver Profi1. In Profi2B the active 5-in!
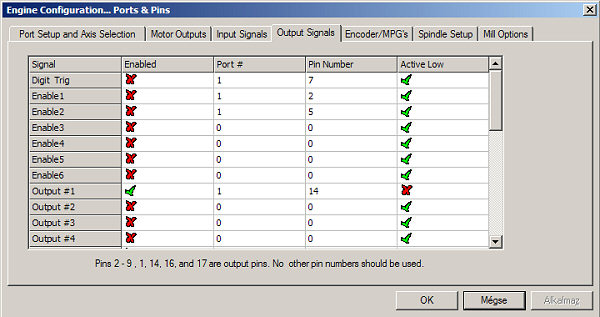
(auxiliary outputs)
Outputs for relays. In our case, is an active, A machine which switches the engine. In Profi2B 4 outputs are active!
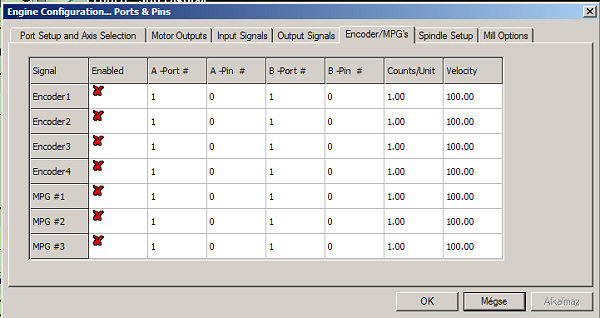
(encoder and MPG inputs)
Here you enter the values for manual control.
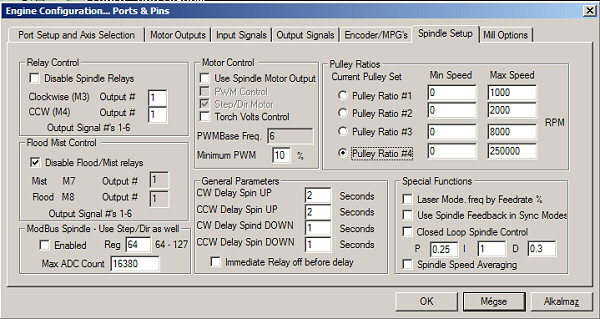
Machine engine control settings.
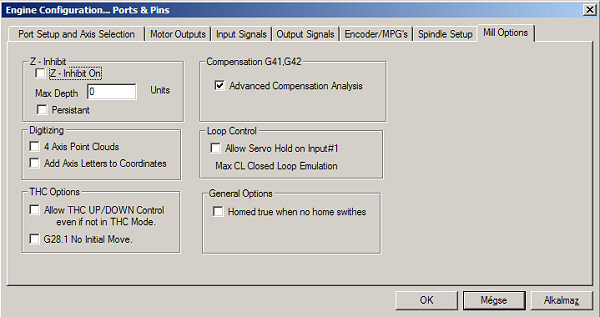
(2.5D, digitalizér, control plasma)
Set engine - engine tuning:
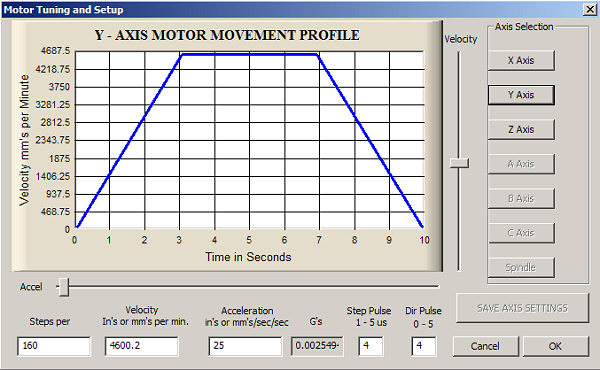
(Motor Tuning)
This is one of the most important setup! Here you must enter data for each engine speed, acceleration, and the stepping.
When the driver is Profi1 Step Pulse = 4 and = 4 Dir Pulse!
Methodology settings:
- First, you need to click on the button after setting the line and save the values of their function - SAVE AXIS SETTINGS!
- Then the next person and the same procedure.
Explanation:
- Step per 1unit = (mm) how many steps are needed to move about 1 mm Velocity = max speed (mm / min)
- Acceleration = acceleration mm/s2, G s = calculated acceleration.
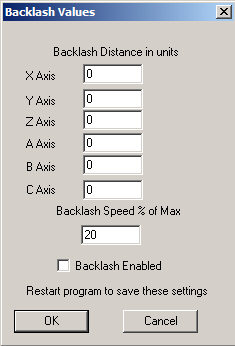
The following menu: Baklash (inaccuracy drive):
Logic menu:
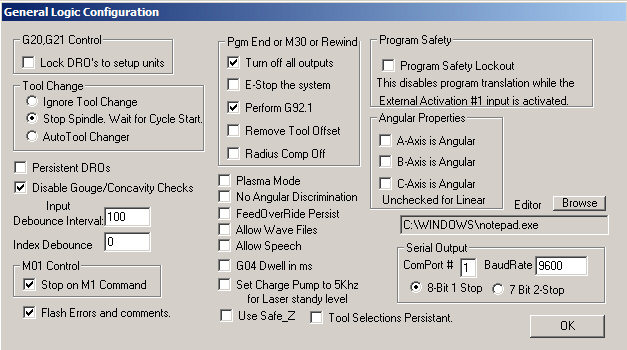
old menu:

(2 menu)
Auto Screen Enlarge = Edit screen for the current value- Profi V2.1 1024×768!
Enhanced Pulsening = when we have a fast enough PC - this function will be stepping smoothly
Motion Mode:
- Costant Velocity = constant speed
- Exact stop = before each instruction stops
Distance Mode:

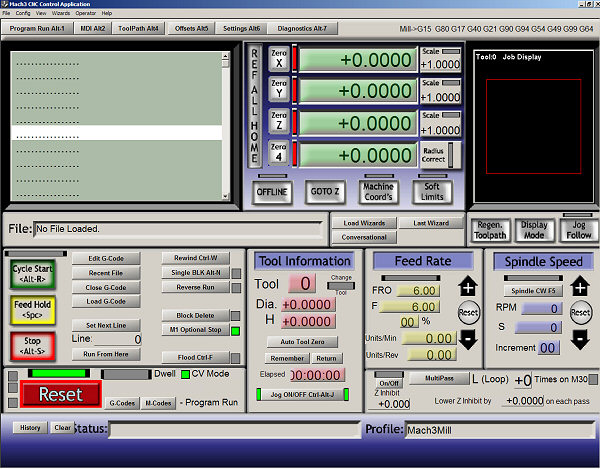
Desktop:
Some fields are taken from Mach2:
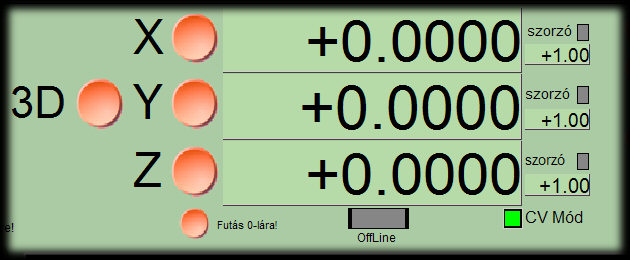
Unit or mm shows the relative coordinates. Tlačítkamy can be reset in the current position. CV mode button indicates a constant speed. Online shines, if only simulates movement - the motor stops.
Hand movement.
When switched to manual control command from the keyboard arrows and tlačítkamy PageUp, PageDown - the same + Shift to accelerate to maximum speed.
Desktop trip:
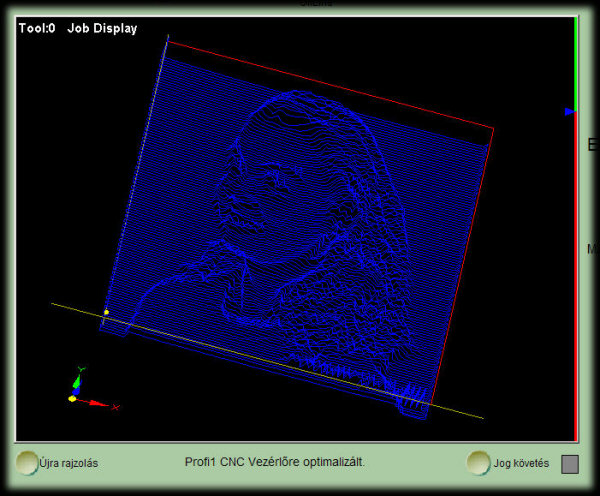
(prac.nástroja track)
Based on the generated G-code tool path set in 3D.
RESET:

(Reset)
While this button lights are all off. Just click it again and can continue working. It can be used as an emergency stop in case of problems.
Test panel:
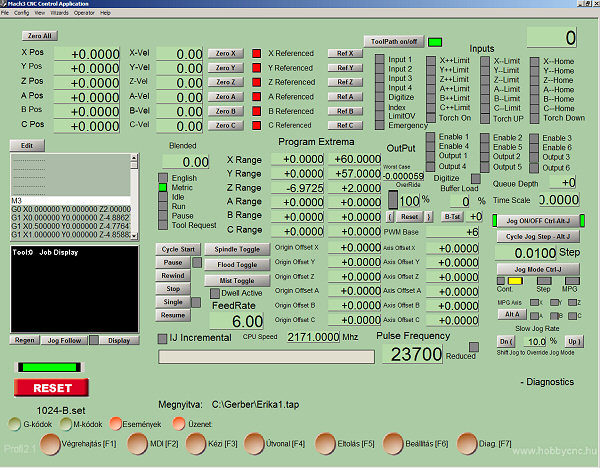
(diagnostic)
Impor folders
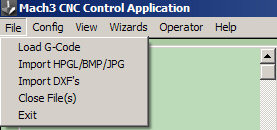
(You select a file type)
Load G-Code used to open the file already generated G-code. For other types of G-code is generated when importing and can be saved. Among other things, already includes the speed setting, depth, and the instrument number below. In later versions it is called Lazy cam - through that you can import files and enter the settings - speed, depth and below.
HPGL (plotter file):
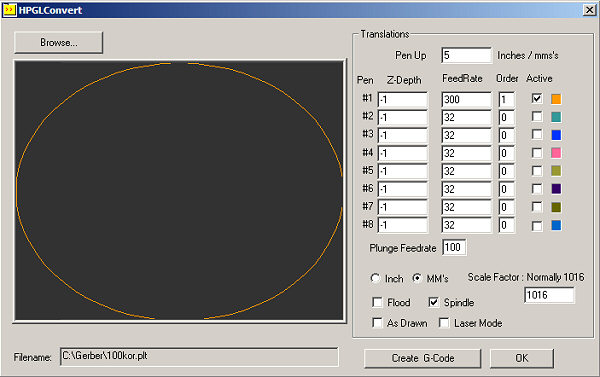
(HPGL format)
For programs that are familiar with export HP plotter files (HPGL), it is reasonable to use already in the design and setup. (eg Corel Draw) in this case, the text no longer need to convert. In DXF to be converted to curves - curves.
Steps: eg.: Corel Draw 11 -> HPGL -> Mach3:
Of course, rates must be set to mm!
Pen Up is the value of such a tool is moved over the material in the unit-level. (Positive numbers)
A Z-Depth is the depth of engraving - machining (negative numbers!) In unit-level.
Drawn and let off when we left to bottom coordinates correspond to a value 0.0 (or 0.0 to the value specified in the Corel)!
Laser Mode - is for laser cutting.
Feedr the engraving speed (unit / min)!
Plunge Feedr staunch rate (Unit / min)!
Spindle must be turned on because the relay switches and hence A machine motor.!
Active ryje krasby only in the desired color!
Order is the order of treatments by color!
Create G-Code should be imposed as follows vagenerovaný G-code!
DXF import:
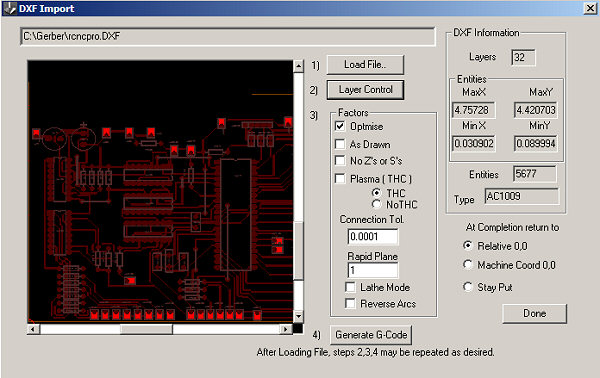
(DXF import)
The DXF format is only R11, R12 supported! Texts must be in curves.!
Steps for importing are numbered!
First Load File (DXF import).
Second Control Layers. The parameters for each step:
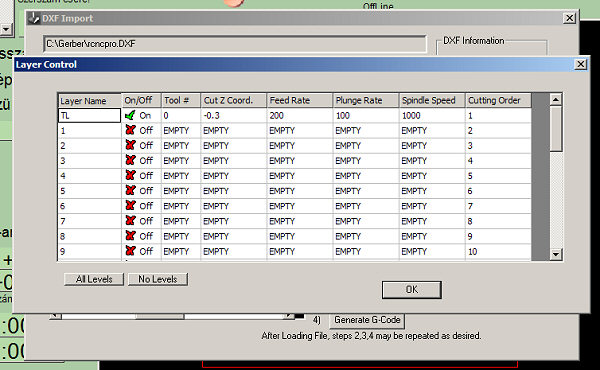
(details of the steps)
This is the most important part. We see each layer we created in the DXF drawing.
Layer Name = name of the layer. On / Off = On use, Off not to use a given layer.
Tool # = The number of layers belonging to the machine tool - an instrument affecting the data path machining
Cut From Coord. = Depth of engraving.
Feed Rate = Speed engraving unit / min
Plunge Rate = Speed dug down when moving unit / min (up to move it up. Speed)
Spindle Speed = Speed Figure. engine - the driver is not Profi1 - regulates the engine
Cutting Order = order of execution
These data will become part of the G-code.
After this it is necessary to save the G-code, otherwise it will not import.
(other parameters)
Rapid Plane - it's height when moving between the engraving tool.
Drawn - The drawing is placed off to the machine coordinate system 0.0. !
Photo Engraving (3D):
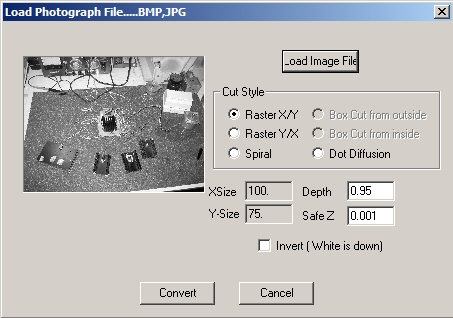
(3D foto )
The basic functions include Mach3 fotogravírovanie 3D! This serves as the input file bmp or jpg. Photo first converted to black and white and shades by then, the desired depth and other parameters. You can specify the depth and also to match the black or white.
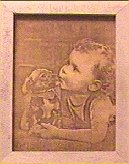
The first step is to prepare the file (setting worthy of the contrasts. This requires experimentation and experience. Then must send a file (Load Image File).
It is necessary to specify the style of engraving. It can be a grid in the X / Y to the dots.
Depth is the deepest point engraving (negative numbers in mm), Safe from the transfer of instruments - the top stop - a positive number.
Inversion - white is the deepest!
This work is very time consuming.
Wizards / Pick - These are development versions of the different working areas, which serve to ease of use and functionality without potrby importovasnia file.
Mach is continually updated and improved, so this description is intended to serve as a reference.

Registration:
(abolition of restrictions)